GUI programming, short for Graphical User Interface programming, is the process of designing, creating, and implementing software that provides a visual representation of an application’s functionality. GUI programming allows users to interact with an application using graphical elements such as buttons, menus, icons, and windows instead of command-line or text-based interfaces.
GUI programming involves creating a user interface using a programming language, such as Python, Java, or C++, and a GUI toolkit, such as Tkinter, Swing, or Qt. The toolkit provides a set of graphical components that can be used to create user interfaces. These components can be customized by setting properties such as size, position, color, and font.
GUI programming is used in a wide range of applications, including desktop software, mobile apps, web applications, and games. It is important for developers to design and implement a user-friendly interface to ensure that users can easily navigate and use their software.
Benefits of GUI Programming :
GUI programming offers several benefits over traditional text-based or command-line interfaces, including:
- Ease of use: GUI interfaces are more intuitive and easier to use than text-based interfaces, especially for novice users. Users can interact with the application using visual elements such as buttons, menus, and icons, which are easier to understand and navigate than text commands.
- Improved productivity: GUI interfaces can help users complete tasks more quickly and efficiently by providing shortcuts, automation, and context-sensitive help. This can lead to increased productivity and user satisfaction.
- Better user experience: GUI interfaces can improve the user experience by providing visual feedback, error messages, and progress indicators. Users can see the effects of their actions immediately and can easily recover from errors.
- Cross-platform compatibility: GUI toolkits such as JavaFX, Qt, and wxWidgets allow developers to create GUI applications that can run on multiple platforms without modification. This makes it easier to develop applications for different operating systems and hardware architectures.
- Attractive (More appealing and modern look): GUI applications can provide a more visually appealing and modern look compared to traditional text-based interfaces. Developers can use graphics, animations, and other visual elements to create engaging user interfaces. Visual images can portray emotions, comments and situations with long lines of computer language. Pictures and such are easy to understand and often carry universal meaning.
- Allows for multitasking : GUI lets users work and view two or more programs at the same time. For example, you can view a streaming presentation while searching the internet from a web browser. You can watch a video while writing a review of the presentation with a search engine in another tab.
- Provides shortcuts : GUI lets users take advantage of shortcut keys to minimize strokes. A combination of two keys in place of several actions saves the user time and increases productivity. For example, a call to-action button can pull up a form, a prefilled letter or a list of contact information. That one button saves you from searching for the same information.
- Easy to Communicate : Visual representation of data is recognized faster than text. Non-programmers find it easy to use GUIs since it requires no experience with computing commands. They don’t have to worry about writing or debugging code. As a result, users find GUI an easy-to-learn interface.
Overall, GUI programming can improve the usability, productivity, and user experience of applications, making them more accessible and appealing to a wider audience.
GUI Programming With Python
GUI programming with Python is a popular choice for creating graphical user interfaces due to its simplicity, flexibility, and ease of use. There are several ways to develop GUI-based programs in Python. Here are some of the most popular options:
- Tkinter: Tkinter is the standard GUI toolkit for Python and comes pre-installed with most Python installations. It provides basic GUI components such as buttons, text boxes, and labels and is easy to learn and use.
- PyQt: PyQt is a popular GUI toolkit that provides more advanced features than Tkinter. It is a binding for the Qt library, which is a cross-platform GUI toolkit used by many applications.
- wxPython: wxPython is another popular GUI toolkit for Python that provides a native look and feel on different platforms. It provides a wide range of GUI components and supports drag and drop, event handling, and internationalization.
- Kivy: Kivy is a cross-platform GUI toolkit that is designed for creating mobile applications. It provides a wide range of GUI components and supports multitouch, gestures, and animations.
- PyGTK: PyGTK is a Python binding for the GTK+ library, which is a popular GUI toolkit used by many applications, including the GNOME desktop environment.
- Jpython : JPython is a Python platform for Java that is providing Python scripts seamless access to Java class Libraries for the local machine.
Each of these options has its own advantages and disadvantages, and the choice of toolkit depends on the requirements of the application and the preferences of the developer.
Introduction to basics of Tkinter
Tkinter is a built-in GUI toolkit for Python that provides basic GUI components such as buttons, text boxes, and labels. It is easy to learn and use, making it a good choice for beginners who want to create simple GUI applications.
Tkinter is a Python interface to the Tk GUI toolkit, which was developed by John Ousterhout at the University of California, Berkeley. Tkinter is included with most Python installations and is cross-platform, which means that Tkinter applications can run on different operating systems without modification.
Some of the features of Tkinter include:
- Basic GUI components such as buttons, text boxes, and labels.
- A wide range of widgets, including canvas, listbox, and scrollbars.
- Support for event handling, which allows developers to respond to user actions such as button clicks.
- Support for multiple windows and dialog boxes.
- Integration with other Python modules, such as NumPy and SciPy.
- Customizable appearance, including fonts, colors, and images.
Here’s an example of a simple Tkinter program that creates a window with a label:
import tkinter as tk
window = tk.Tk()
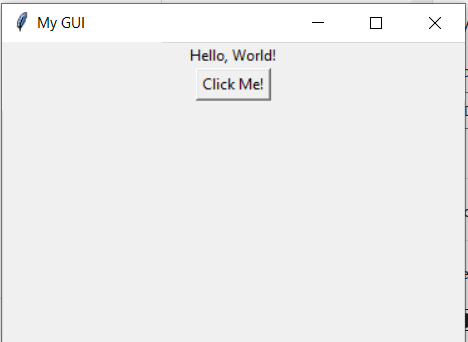
window.title("My GUI")
label = tk.Label(window, text="Hello, World!")
label.pack()
button = tk.Button(window, text="Click Me!")
button.pack()
window.mainloop()Above code creates a window with a label and a button. When the button is clicked, nothing happens because we haven’t specified any event handlers yet.
Output :
PyQt is another popular GUI toolkit for Python that provides more advanced features than Tkinter. It is a binding for the Qt library, which is a cross-platform GUI toolkit used by many applications. PyQt requires installation, and its syntax is slightly different from Tkinter. Here is an example of a PyQt program:
import sys
from PyQt5.QtWidgets import QApplication, QLabel, QPushButton, QVBoxLayout, QWidget

app = QApplication(sys.argv)
window = QWidget()
window.setWindowTitle("My GUI")

layout = QVBoxLayout()

label = QLabel("Hello, World!")
layout.addWidget(label)

button = QPushButton("Click Me!")
layout.addWidget(button)

window.setLayout(layout)
window.show()

sys.exit(app.exec_())
Output:
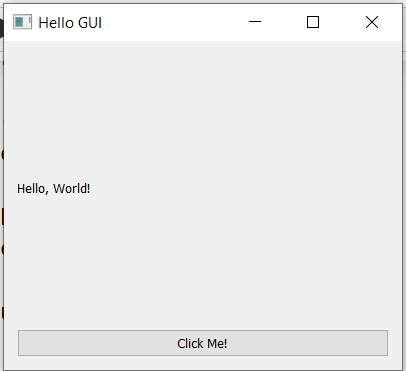
This code creates a window with a label and a button using a vertical box layout. When the button is clicked, the program exits because we haven’t specified any event handlers. Both Tkinter and PyQt have their own advantages and disadvantages, and the choice of toolkit depends on the requirements of the application and the preferences of the developer.
Tkinter Widgets
Tkinter provides a wide range of GUI widgets that can be used to create user interfaces. There are two main methods used which the user needs to remember while creating the Python
application with GUI.
1. Tk (screenName=None, baseName=None, className=’Tk’, useTk=1):
To create a main window, tkinter offers a method ‘Tk(screenName=None, baseName=None, className=’Tk’, useTk=1)’. To change the name of the window, you can change the className to the desired one. The basic code used to create the main window of the application is: m=tkinter.Tk() where m is the name of the main window object
2. mainloop(): There is a method known by the name mainloop() is used when your application is ready to run. mainloop() is an infinite loop used to run the application, wait for an event to occur and process the event as long as the window is not closed.
m.mainloop()
Here are some commonly used Tkinter widgets along with examples:
- Label Widget:
The Label widget is used to display text or images in the GUI.The syntax for creating a Label widget in Tkinter is as follows:
label = tk.Label(parent, options)where tk is the Tkinter module, parent is the parent widget, and options are the configuration options for the label.
- Example:
import tkinter as tk
window = tk.Tk()
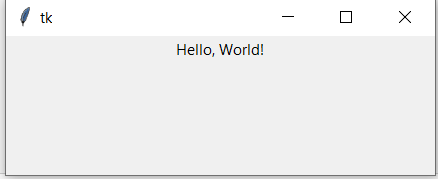
label = tk.Label(window, text="Hello, World!")
label.pack()
window.mainloop()In this example, tk.Tk() creates a new window, tk.Label() creates a Label widget with the text “Hello, World!”, and label.pack() adds the Label widget to the window. Finally, window.mainloop() starts.
Output :
2. Button Widget:
The Button widget is used to create a button that can be clicked by the user to trigger an action.
The syntax for creating a button widget in Tkinter is as follows:
button = tk.Button(parent, options)Here, parent is the parent widget in which the button will be placed, and options are the configuration options for the button. The options can be specified as keyword arguments.
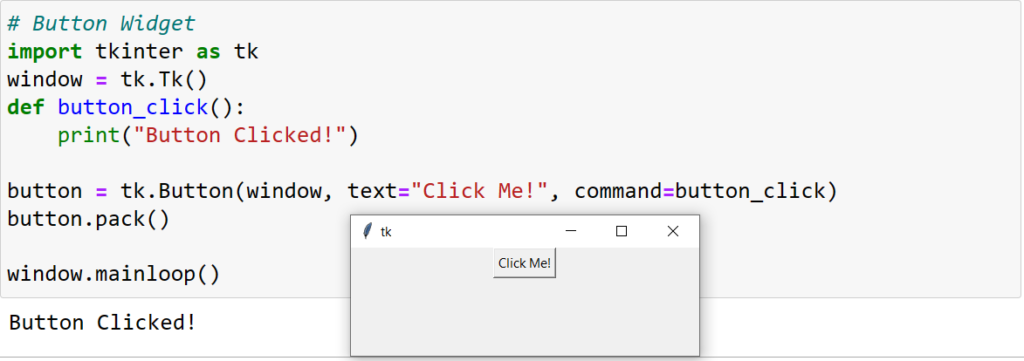
Here is an example code that creates a button widget and sets its text to “Click Me!
import tkinter as tk

window = tk.Tk()

def button_click():
    print("Button Clicked!")

button = tk.Button(window, text="Click Me!", command=button_click)
button.pack()

window.mainloop()
Output :
3. Entry Widget:
The Entry widget is used to create a text box that allows the user to enter text.In Python Tkinter, the syntax for creating an Entry widget is:
entry = tk.Entry(parent, options) where tk is the Tkinter module, parent is the parent widget, and options are the configuration options for the Entry widget.
Here’s an example:
import tkinter as tk

window = tk.Tk()

entry = tk.Entry(window)
entry.pack()

window.mainloop()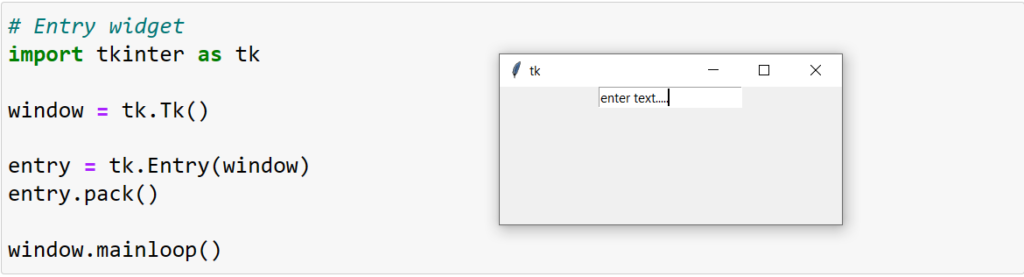
In this example, tk.Tk() creates a new window, tk.Entry() creates an Entry widget, and entry.pack() adds the Entry widget to the window. Finally, window.mainloop() starts the main event loop, which handles user events and updates the GUI. You can also set the initial value of the Entry widget using the text or variable options. For example, you can create an Entry widget with an initial value of “Hello, World!” using either of the following lines:
entry = tk.Entry(window, text="Hello, World!")
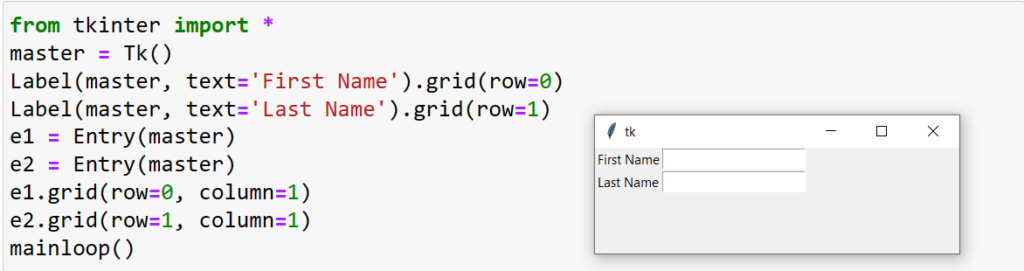
entry = tk.Entry(window, variable=tk.StringVar(value="Hello, World!"))Example 2:
4. Checkbutton Widget:
The Checkbutton widget is used to create a checkbox that can be checked or unchecked by the user. In Python Tkinter, the syntax for creating a Checkbutton widget is:
checkbutton = tk.Checkbutton(parent, options)Here’s an example:
import tkinter as tk

window = tk.Tk()

var = tk.IntVar()

checkbutton = tk.Checkbutton(window, text="Check Me!", variable=var)
checkbutton.pack()

window.mainloop()
Output :

In this example, tk.Tk() creates a new window, tk.Checkbutton() creates a Checkbutton widget with the text “Check me!”, and checkbutton.pack() adds the Checkbutton widget to the window. Finally, window.mainloop() starts the main event loop, which handles user events and updates the GUI.
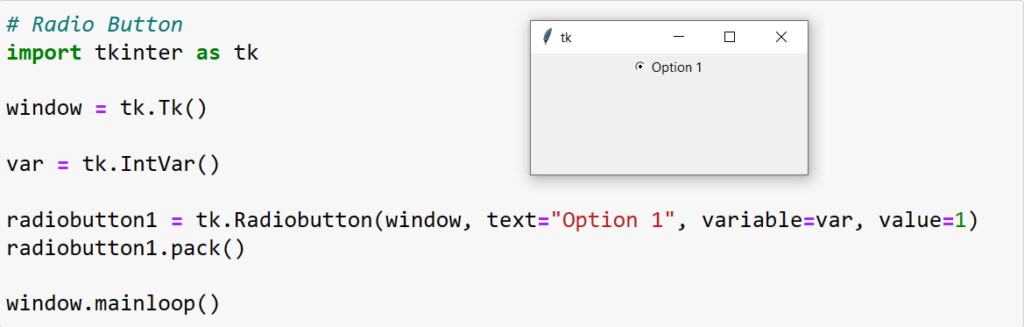
5. Radiobutton Widget:
The Radiobutton widget is used to create a set of radio buttons that allow the user to select one option from a group of options. In Python Tkinter, the syntax for creating a RadioButton widget is:
radio_button = tk.Radiobutton(parent, options)where tk is the Tkinter module, parent is the parent widget, and options are the configuration options for the RadioButton widget.
Here is an example code snippet that creates a group of RadioButton widgets with different options and adds them to the main window:
Here’s an example:
import tkinter as tk

window = tk.Tk()

var = tk.IntVar()

radiobutton1 = tk.Radiobutton(window, text="Option 1", variable=var, value=1)
radiobutton1.pack()
Output :
Example 2:
import tkinter as tk

# Create a new window
window = tk.Tk()

# Create three RadioButton widgets
radio_button1 = tk.Radiobutton(window, text="Option 1", value=1)
radio_button2 = tk.Radiobutton(window, text="Option 2", value=2)
radio_button3 = tk.Radiobutton(window, text="Option 3", value=3)

# Add the RadioButton widgets to the window
radio_button1.pack()
radio_button2.pack()
radio_button3.pack()

# Start the main event loop
window.mainloop()
Output :
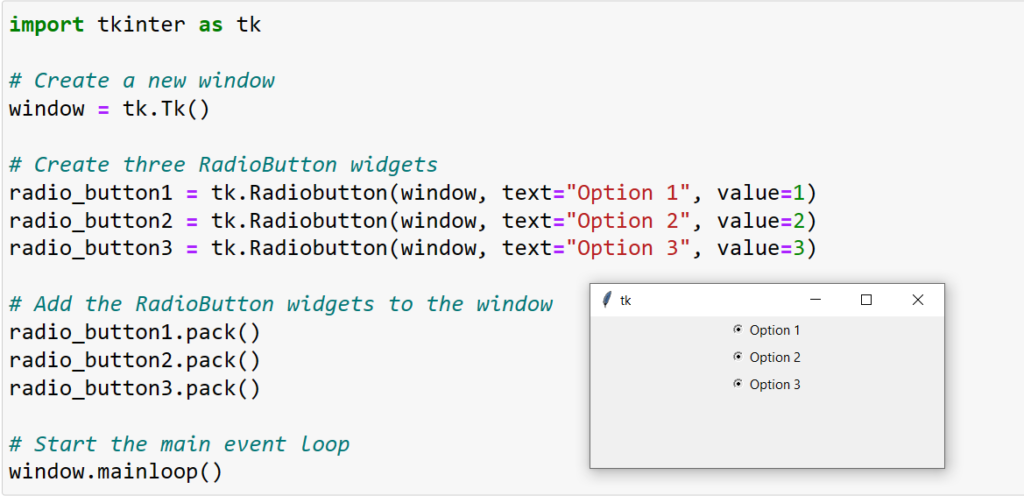
In this example, tk.Tk() creates a new window, tk.Radiobutton() creates three RadioButton widgets with different options, and radio_button.pack() adds the RadioButton widgets to the window. Finally, window.mainloop() starts the main event loop, which handles user events and updates the GUI.
You can customize the appearance and behavior of the RadioButton widgets by using different options, such as text for the label text, value for the value associated with the RadioButton, variable for the variable used to track the selected RadioButton, and command for the callback function to be called when the RadioButton is selected.
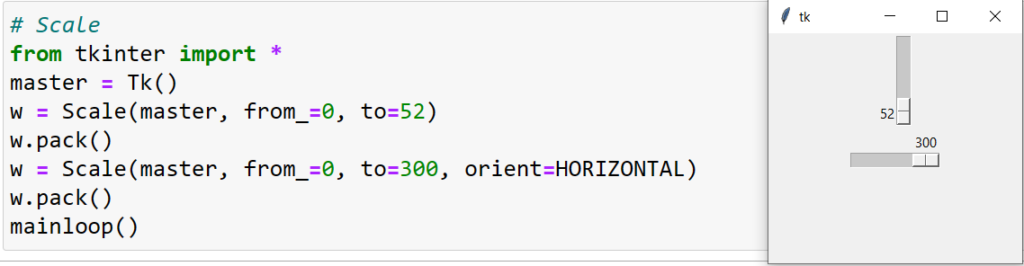
6. Scale Widget:
It is used to provide a graphical slider that allows to select any value from that scale. The general syntax is:
w = Scale(master, option=value)
master is the parameter used to represent the parent window.
There are number of options which are used to change the format of the widget. Number of options can be passed as parameters separated by commas. Some of them are listed below.
- cursor: To change the cursor pattern when the mouse is over the widget.
- activebackground: To set the background of the widget when mouse is over the widget.
- bg: to set the normal background color.
- orient: Set it to HORIZONTAL or VERTICAL according to the requirement.
- from_: To set the value of one end of the scale range.
- to: To set the value of the other end of the scale range.
- image: to set the image on the widget.
- width: to set the width of the widget.
Example :
from tkinter import *
master = Tk()
w = Scale(master, from_=0, to=52)
w.pack()
w = Scale(master, from_=0, to=300, orient=HORIZONTAL)
w.pack()
mainloop()
Output
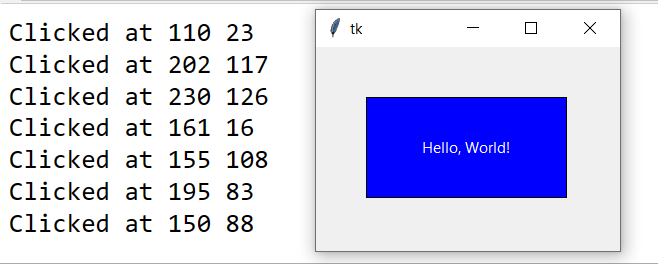
7. Canvas
The Tkinter Canvas widget is a graphical object that allows for drawing and displaying of 2D graphics and other visual elements. The Canvas can be used to create shapes, lines, text, and images, and allows for interactivity through event handling.The general syntax is:
w = Canvas(master, option=value)
master is the parameter used to represent the parent window.
There are number of options which are used to change the format of the widget. Number of options can be passed as parameters separated by commas. Some of them are listed below.
- bd: to set the border width in pixels.
- bg: to set the normal background color.
- cursor: to set the cursor used in the canvas.
- highlightcolor: to set the color shown in the focus highlight.
- width: to set the width of the widget.
- height: to set the height of the widget.
Example
import tkinter as tk

root = tk.Tk()

# Create a Canvas widget with a width of 300 pixels and a height of 200 pixels
canvas = tk.Canvas(root, width=300, height=200)

# Create a rectangle on the Canvas with coordinates (50, 50) and (250, 150)
rect = canvas.create_rectangle(50, 50, 250, 150, fill="blue")

# Create text on the Canvas at position (150, 100)
text = canvas.create_text(150, 100, text="Hello, World!", fill="white")

# Bind the Canvas to the left mouse button click event and print the coordinates of the click
def print_coords(event):
    print("Clicked at", event.x, event.y)
canvas.bind("<Button-1>", print_coords)

# Pack the Canvas into the window and start the event loop
canvas.pack()
root.mainloop()
Output:
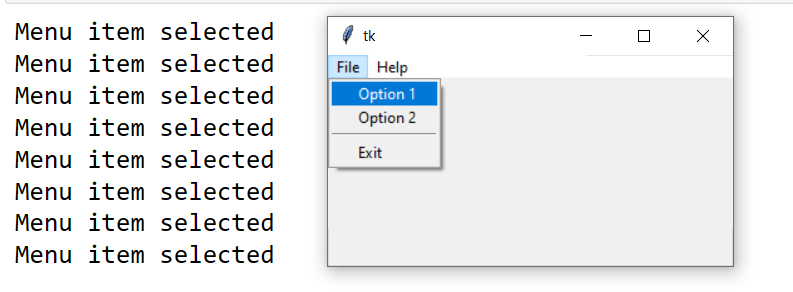
8. Menu Widget
The Tkinter Menu widget is a graphical control element that allows you to create and display a hierarchical menu in a window or frame. It is commonly used in GUI applications to provide a list of options or actions for the user to select.It is used to create all kinds of menus used by the application.
The general syntax is:
w = Menu(master, option=value)
master is the parameter used to represent the parent window.
There are number of options which are used to change the format of this widget. Number of options can be passed as parameters separated by commas. Some of them are listed below.
- title: To set the title of the widget.
- activebackground: to set the background color when widget is under the cursor.
- activeforeground: to set the foreground color when widget is under the cursor.
- bg: to set the normal background color.
- command: to call a function.
- font: to set the font on the button label.
- image: to set the image on the widget.
import tkinter as tk

root = tk.Tk()

# Define a function to be called when a menu item is selected
def menu_callback():
    print("Menu item selected")

# Create a top-level Menu widget
menu = tk.Menu(root)

# Create a sub-menu with some items
submenu = tk.Menu(menu, tearoff=0)
submenu.add_command(label="Option 1", command=menu_callback)
submenu.add_command(label="Option 2", command=menu_callback)
submenu.add_separator()
submenu.add_command(label="Exit", command=root.quit)

# Add the sub-menu to the top-level menu
menu.add_cascade(label="File", menu=submenu)

# Add another menu item directly to the top-level menu
menu.add_command(label="Help", command=menu_callback)

# Attach the menu to the window
root.config(menu=menu)

root.mainloop()
Output
Other Widgets : Frame,Listbox, MenuButton,Message,Scrollbar ,Text,TopLevel, SpinBox, PannedWindow
Here is a list of some of the commonly used Python Tkinter widgets:
Button: a graphical button that can be clicked by the user to perform an action.Label: a text label that displays a message to the user.Entry: a text box that allows the user to enter text.Text: a multi-line text box that allows the user to enter and display multiple lines of text.Frame: a container widget that can hold other widgets.Canvas: a graphical drawing area that can be used to create shapes, images, and other graphical elements.Menu: a drop-down menu that allows the user to select from a list of options.Scrollbar: a widget that allows the user to scroll through a larger area, such as a text box or canvas.Checkbutton: a graphical checkbox that can be checked or unchecked by the user.Radiobutton: a graphical button that allows the user to select one option from a group of options.Scale: a graphical slider that allows the user to select a value from a range of values.Listbox: a list of items from which the user can select one or more items.Spinbox: a text box that allows the user to enter a numerical value by clicking up and down arrows.Message: a widget that displays a message to the user in a box with a title.LabelFrame: a container widget that groups other widgets together with a border and a title.
There are also more advanced widgets available in Tkinter, such as Treeview, Notebook, and PanedWindow, which provide more complex functionality for organizing and displaying data.
Simple Calculator using Tkinter GUI
import tkinter as tk

root = tk.Tk()
root.title("Calculator")

# Define the functions for the calculator operations
def add():
    result = float(num1.get()) + float(num2.get())
    output_label.config(text="Result: " + str(result))

def subtract():
    result = float(num1.get()) - float(num2.get())
    output_label.config(text="Result: " + str(result))

def multiply():
    result = float(num1.get()) * float(num2.get())
    output_label.config(text="Result: " + str(result))

def divide():
    result = float(num1.get()) / float(num2.get())
    output_label.config(text="Result: " + str(result))

# Create the input fields for the numbers
num1_label = tk.Label(root, text="Enter first number:")
num1_label.grid(row=0, column=0)

num1 = tk.Entry(root)
num1.grid(row=0, column=1)

num2_label = tk.Label(root, text="Enter second number:")
num2_label.grid(row=1, column=0)

num2 = tk.Entry(root)
num2.grid(row=1, column=1)

# Create the buttons for the calculator operations
add_button = tk.Button(root, text="+", command=add)
add_button.grid(row=2, column=0)

subtract_button = tk.Button(root, text="-", command=subtract)
subtract_button.grid(row=2, column=1)

multiply_button = tk.Button(root, text="*", command=multiply)
multiply_button.grid(row=3, column=0)

divide_button = tk.Button(root, text="/", command=divide)
divide_button.grid(row=3, column=1)

# Create the output label for the result
output_label = tk.Label(root, text="Result: ")
output_label.grid(row=4, column=0, columnspan=2)

root.mainloop()
Output :

In this example, we create a window using the Tk() method and set its title to “Calculator”. We define four functions add(), subtract(), multiply(), and divide() that perform the corresponding arithmetic operations on the numbers entered in the input fields and display the result in the output label.
We create two input fields using the Entry() method and two labels using the Label() method to prompt the user to enter the two numbers. We create four buttons using the Button() method to perform the arithmetic operations and call the corresponding functions. We create an output label using the Label() method to display the result of the operation.
We use the grid() method to place the input fields, labels, buttons, and output label in the window. We set the row and column values to specify their position in the grid. We use the command parameter to specify the function to be called when a button is clicked.
When you run this program, you will see a window with two input fields, four buttons, and an output label. You can enter two numbers in the input fields and click one of the buttons to perform the corresponding arithmetic operation and display the result in the output label.
References :